

Making chain maille is not only a fun and addictive pastime, but you also get to wear what you have created.
It can be difficult to know where to start so we have gotten together a little list that will hopefully help you.
1. Master opening and closing jump rings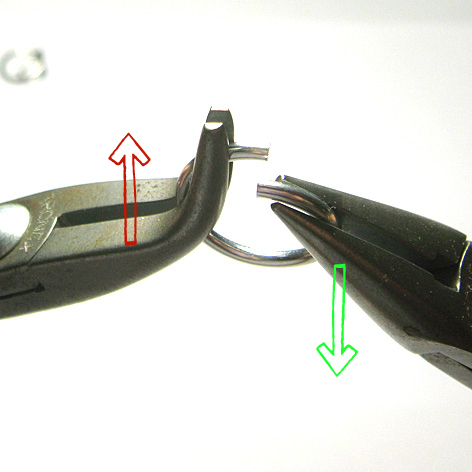
Nothing can ruin the look and impact of your work like badly closed rings. Grab a handful of rings (just cheap from your local craft store will do for this exercise) and practice. You don’t need to make a piece and worry about ring placement, just practice the basics first. See How to Open and Close Jump Rings
2. Learn the terminology.
Understand what the various gauge systems mean. Why do pliers need to be smooth jawed…what is smooth jawed? Why does the difference between ring ID and OD (and what do those abbreviations even stand for) make a huge difference to you? You are going to need to know this and more. Before you purchase anything, make sure you know what you need. It will save you time, money and the frustration of having to return incorrect items. Here are some Common Mailling Terms that will help you on your way.
3.  Invest in good quality tools.
My motto is always “buy the best that you can afford”. This doesn’t mean buy the most expensive, but it does mean take the time to do a little research. Sure there is nothing stopping you from using the pliers you found in the tool box, but those teeth are going to ruin your work and you will quickly be looking for better tools. Believe me…pliers can be as addictive as buying jump rings. See our range of pliers.
4. Learn about Aspect Ratio.
I will be forever grateful to the person who after I proudly showed off my first ever piece of chain maille gently suggested I look into Aspect Ratio. Yes it’s maths, but you don’t need to be afraid. My honest advice is learn it early and learn it well, you will thank me later. See AR explained.
5. Start at the beginning
Obvious right, but often I have brand new maillers coming to me with a picture they have seen and fell in love with it and just as often the weave shown is an expert level weave. I’m not saying ambition is wrong, it’s great and I am not suggesting you shouldn’t aim high but often attempting a too difficult weave can leave you with a bad taste in your mouth. Complete something level appropriate and feel the buzz. We have listed some examples for you to start with.
6. Buy a kit.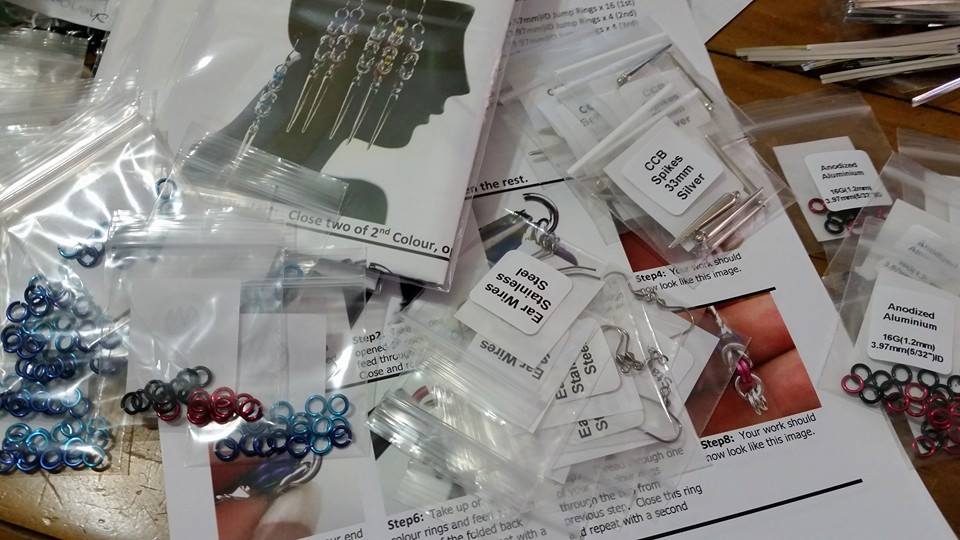
Ok, you’ve done all the reading and you are ready to start but suddenly the choices are overwhelming. We’ve all been there and indecision can be a killer of enthusiasm. My suggestion is start with a kit designed with a beginner in mind. It will include all you need as far as components are concerned. (Note: Aussie Maille includes printed instructions in all their kits, but not all suppliers do so make sure you double check that.) All the working out has been done for you and you will soon have a finished piece that your family and friends can ooh and ahh over. We have a large range of kits for you to choose from.
7. Take breaks.
When I teach I always insist on my students putting their tools down and taking a break. It is often met with laughter and calls of “yes mum” but it is important. As a beginner you are keen to finish your first piece, I know I have been there, but if you damage/hurt your hands and wrists doing something they aren’t used to you will very quickly end your newfound joy. Even experienced maillers need to take regular breaks if they don’t want to ruin their hands, wrists and arms.
8. Have a well lit area to work in.
You are in most cases working with very small jump rings. You will need good lighting believe me. I would also recommend something to magnify your work. It will help with eye strain and make closing those rings that much easier.
 9. Don’t get discouraged
Like any other learned skill, chain maille has a learning curve. Your first piece may have some dodgy joins or a few marred rings but that’s OK. Be kind to yourself, you will get there. Don’t let your first project ruin your enthusiasm. Just keep trying and keep in mind that all skills take time and practice to develop.
10. Find a community.
After your first piece you are going to be running around showing off your work to all that will sit still long enough. We get that, we get you but your family and friends may not. Find a community of like minded people. It will not only give you a place to show off your work to people who understand, but it will also help you to grow. Visit our FaceBook page to see what everyone else is up to.